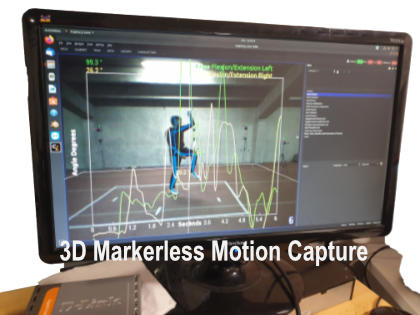
REPLAY24 a package / bundle that includes REPLAY by Captury Gmbh and accompanying 3D sample files from AnamoLAB.
REPLAY24 is used to play back 3 dimensional motion capture screenings of athletes, clients or patients. The sample files here are granted by permission of the subjects for educational use. They can be used to try out REPLAY24 and explore / review the matrices that the files provided will generate.
REPLAY24 Required Specification
The REPLAY Software included here is designed for the PC. A Windows 10 home based PC or higher is required. Since the Replay software machine
It is advisable to install the product on your hard drive and not on the supplied USB drive, due to the limited USB Bus speed.
Installing REPLAY24
The replay software is available here as a simple Zip file. (The latest version, as of January 2023 is CapturyReplay-252b.zip )
- Create a folder on your PC’s hard drive called AnamoREPLAY.
- Copy the zip file to C:\AnamoREPLAY and run it
This should unzip and create a folder called CapturyReplay-252b and in that folder you will find an executable Application file called CapturyReplay
It is advisable to also create a directory in the C:\AnamoREPLAY directory called Footage
Sample files can be placed in this directory.
Running REPLAY23
To start CapturyReplay, simple double click on the executable Application file titled: CapturyReplay
One can get an unsigned software warning with this.
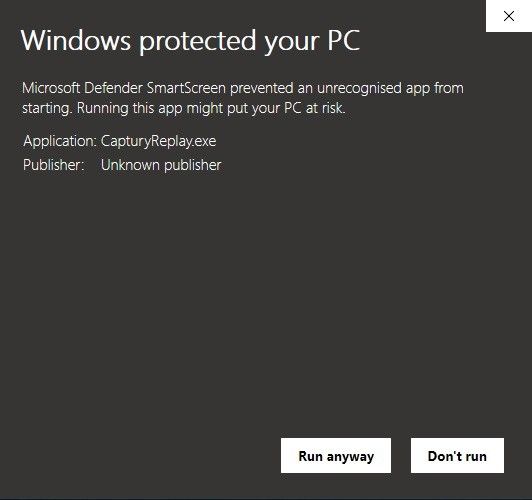
Should this occur, choose “More info” to see the above window. The software needs explicit permissions to run on some systems, and you may need to choose “run anyway”.
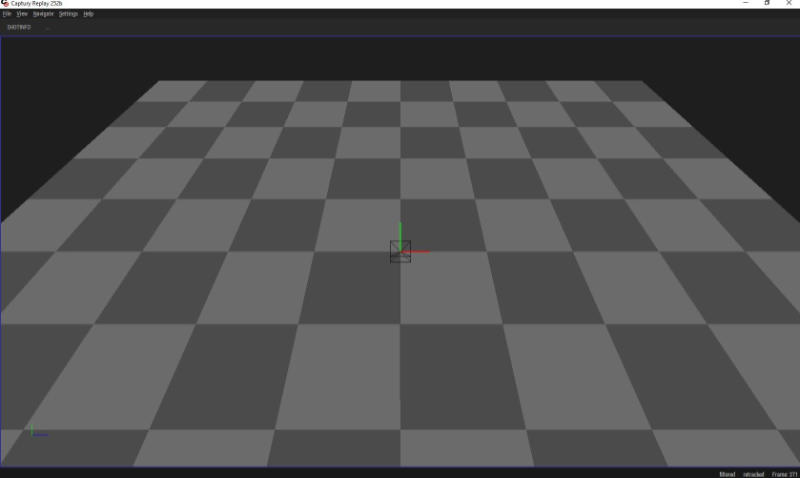
The Replay software is designed to simply run and display 3D - Dimensional motion capture screenings.
To Get Started…
To get started, on the menu, you cannot just select “File → Open”
Assuming that you have a blank state …
From the main menu choose… “View” → “Panels” and ensure that the following are selected
- cameraPreview
- shotManagement
- chart
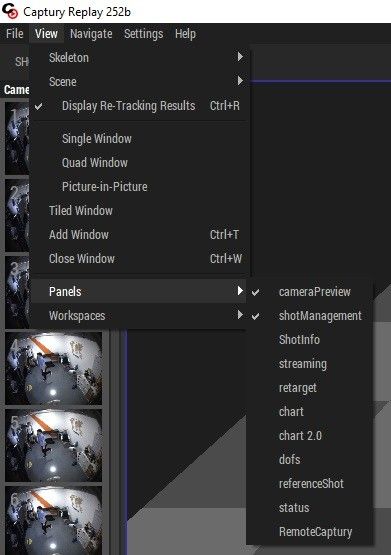
The ShotManagement panel is where you select the capture files for viewing and analysis.
The CameraPreview panel shows the available captured camera streams. Selecting a camera will change the 3D render to the view from that camera. Viewing and render angles are limited to the camera’s perspective
And Chart displays the charting options.
Play and Display
To open your first sample capture, on the shotManagement panel, select the “burger” button (insert pic of burger button) and choose “Browse”
This will open the windows file selection window. Choose the directory folder containing the root of all the samples files (either on your hard disc, or a provided USB memory stick)
IF you choose a file in the middle of the a capture directory, you will get a pop up warning as it moves the user to the parent directory and then display a collection of folder names.
Each capture is a set of files in each of the folders. The types of files include video streams, a database of movements and charting/functional calculations for the joints and possible, depending of the type of capture, a file used for 3D animation software.
From the shotManagement panel, choose a capture (for example: Squat)
This will populate the other panels. In the center, there will be a larger view of the 3D render of the subject capture.
The CameraPreview view will show a stream of the different available camera feeds. Selecting a feed (each camera is numbered, you can either click on it using the mouse, or type in the camera number), will change the angle of the main view to the camera’s angle.
Using the centre button of your mouse on the main view will enable you to zoom in and out during the playback.
Along the top of the shotManagement panel, you can see a play/pause set of buttons (and a loop toggle on the right hand side) with a progress bar running to the left of them. The progress bar is incremented by frame number. Most of our captures are 50 frames a second. While this can be adjusted during a capture, it cannot be altered in CapturyReplay.
3D View
Between these options, it is possible to view playback of the subject from multiple views in the main 3D view.
Yes, the 3D view is the main viewing window of CapturyReplay..
The 3D view shows the current scene through the selected camera, or in a free 3D view.
Unfortunately you will need a mouse, preferably a 3 button mouse, to get the fullest use out of the Shot.
The default navigation controls are:
- Rotate scene: middle mouse button
- Translate scene: Shift+middle mouse button
- Zoom scene: Alt+middle mouse button / mouse wheel
- Center on camera: double click middle mouse button
- Change camera: up/down arrow / click on camera
- Previous/next frame (when paused): left/right arrow
- Context menu on hovered object: right mouse button
- Select hovered object: Ctrl+left mouse button
- Move selected object: press/drag left mouse button
When a camera is selected, the user can zoom into the image using the mouse wheel and navigate the image by dragging while using the middle mouse button. To enter the free 3D mode again, the user can zoom out of the camera view.
IF you move from the camera view of zoom level, you will be presented with a 3D rendered view. This is also useful by itself as it can remove / or reduce the complexity of the 3D render from a mesh or a video of the subject and view the 3D rendered skeleton.
The Skeleton options include a “Bones Only” which show a headless stick puppet figure and a 3D mesh which shows an avatar of a human body, but with a head. Both options can include fingers with finger movements if the option to do so were included at the capture session. Otherwise flat “fin-like” hands are shown to indicate wrist movements,
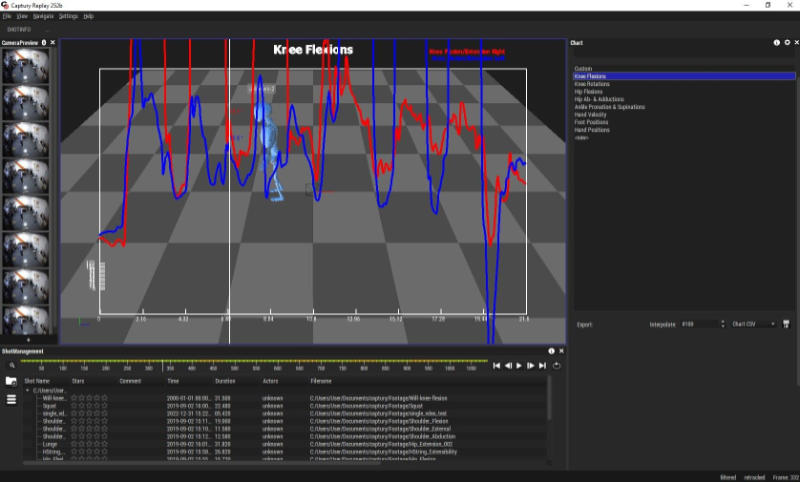
Chart Options
The full details of the charting options in REPLAY, including the generation of custom charts are at …
Captury Live Help - Charting Tools
The default charting options are:
- Custom
- Knee Flexions
- Knee Rotations
- Hip Flexions
- Hip Ab- & Adductions
- Ankle Pronation & Supinations
- Hand Velocity
- Foot Positions
- Hand Positions
- Sagittal Hand Velocity test Sagittal Hand Acceleration Test
- Shoulder External Rotation Test
- Hand Pronation Test Trunk Lean Test (Torso)
- Pelvis, Trunk, Shoulder, Hand Summation of Velocity
In CapturyReplay version 252b, the charting export options are limited to CSV spreadsheet files only.
These can be used for further analysis or for alternative chart creation.
You may need to use the setting options for charts, if the chart does not display correctly on the screen.
The most likely change is under “Advanced Setting → Values, Legend, Title
Most likely the Values scale is too high or the Offset is incorrect.
Sometimes the automatic setting is not correct.
Chart 2.0
Version 252b also includes the “Chart 2.0” panel with easier custom chart creation, however exporting is disabled in this version
This is based around custom options, and you can set a chart for any monitored joint.